While these instructions are specific to the Ashbery style of vinyl fencing, the instructions are relatively similar for every type of VEKA vinyl fence.
Recommended Tools and Materials
- String
- Stakes
- Marking chalk or paint
- Saw
- Tape
- Level
- Post Hole Digger
- Shovel
- Measuring Tape
- Concrete
STEP ONE
Check area for obstructions, underground cables, water lines, gas lines, etc. Be sure to comply with all local building codes.
Plan for gates. Make the opening between posts exactly the ordered size of the gate. The actual size of the gate will be 1.5” smaller to allow clearance for hinges and latch. For example, a 36” wide gate will be made 34.5” wide. Be sure the posts are plumb, level and aligned.
Allow for short sections. In almost every situation the layout you have chosen will require a section shorter than the pattern that was purchased. This is done by cutting the top and bottom rails to length. The remaining length can be used through the corner or discarded and a new section started.
For sloped ground, nibblers or files suitable for PVC can be used to enlarge a routed hole or the fence can be stepped (see FENCE STEPPING). In some cases it is necessary to run a fence across concrete or deck material. This can be done by purchasing post mounts. The post is then cut off to the correct height and slipped over the mount.
STEP TWO
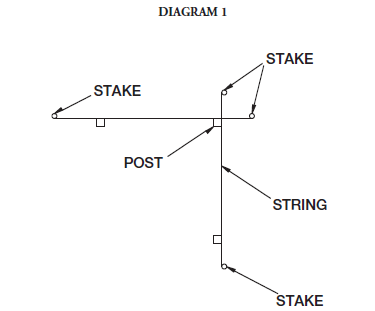
Using stakes and string, run a line that will locate where the fence posts will be positioned. Use a fence post and set it on top of the ground at the first corner. Put stakes as shown (see Diagram 1). Repeat for all corners. Run the line at same height as desired for bottom rail.
STEP THREE
Use a measuring tape and marking chalk/paint to run along the string and mark for the center posts.
STEP FOUR
Remove string without removing stakes. Using auger bit (8” for 4” posts, 12” for 5” posts) or a post hole digger, dig down to proper depth while remaining plumb. Repeat for each post mark.
Frost Considerations: Frost heave is the result of frozen soil pushing up fence posts. The local water utility or agricultural extension office can confirm the depth of the frost line in your area. Putting concrete below the frost line will prevent frost heave.
STEP FIVE
Re-Attatch String to stakes.
STEP SIX
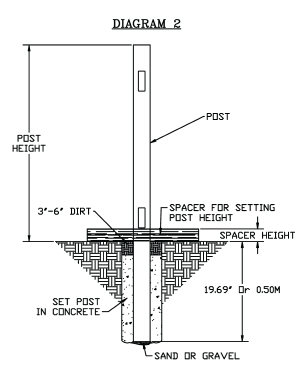
* It is strongly recommended that all posts be set in concrete. Insert bottom rail into post. Pile fine gravel or sand into a small mound in the middle of the hole to the post. Put some type of spacer across hole to hold post at proper height. Set posts in holes (end, corner or line). Check distance from next post, height and level. Hold post in its desired location. Post should be kept a slight distance from the string line to prevent deflection. Lightly tamp post with only enough dry concrete mix to hold location (still adjustable). Make sure post is exactly where it should be. Hold post in place and fill hole with concrete to 3”-6” below ground level. Fill remainder of hole with dirt. Repeat for remaining posts remembering to always insert bottom rail before filling with concrete (see diagram 2). If using brackets, mount bottom rail brackets prior to installing posts.
Note: Unless the post is being filled with concrete, it is more important that there is sand under the post to drain water. A hollow post on concrete may collect water. If the water freezes, it may split the concrete around the post making it loose.
STEP SEVEN
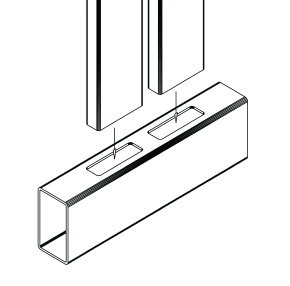
Insert top and bottom rails into posts. Slide pickets down through top rail using the routed holes on the top and bottom surface. Continue sliding the pickets down into the routed holes on the top of the bottom rail. If desired notch the bottom of the pickets to secure them inside the bottom rail. Put caps onto the pickets. (Glue maybe required for the picket caps)
STEP EIGHT
Put caps on all posts. Clean up posts, removing any concrete from above ground surfaces.
STEP NINE
Follow the Care & Maintenance Guidelines located in the Company & Product Information section of the VEKA Innovations dealer manual.


