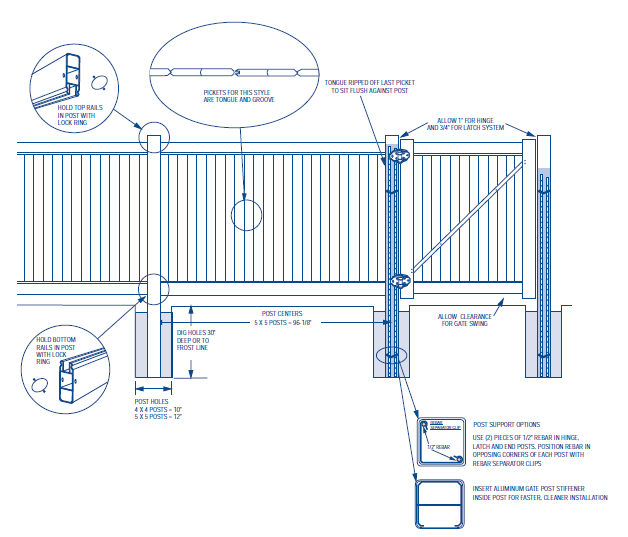
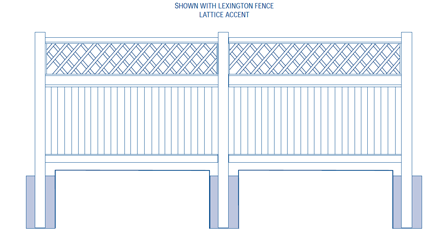
The following installation guide is meant to help you install the New Lexington style privacy fence manufactured by Bufftech. These instructions will work for many other series of Bufftech fencing, but the downloadable installation manual we provide details every style of Bufftech fence, including post & rail, and instructions on stepping and racking fence for installing fences on sloped property.
Tools and Materials
Getting Started
- Site plans and permits
- Measuring tape
- Hammer
- Wooden stakes
- String line
- Spray paint for hole centers or post and gate spacing
Assembling Fences / Gates
- Drop cloth
- Hacksaw, circular saw, or chop saw with masonry blade
- Square
- Phillips #2 screwdriver
- Drill and drill bits
- 1/8″ for #8 screws
- 1/4″ for bullet clips and drain holes
- 3/8″ for lock rings
- 1/2″ deep socket (or nut driver) for traditional picket
Digging Holes
- Post Hole Digging Tools
- Shovel
- Post hole digger
- 10″ auger for 4 x 4 posts
- 12″ auger for 5 x 5 posts
Installing Fence Posts
- Wheelbarrow
- Concrete mixing tools
- Short length of wood, 2 x 4 for tamping concrete
- Garden hose
- Level
- Template kit with router
- Spiral saw
Installing Bottom Rails
- Leveling blocks
- Shim stock
- Duct tape to seal rail ends
Installing Gate(s)
- Wrench – 7/16″ for hinge nuts
- Flat screwdriver to activate hinge spring
Filling Post with Concrete
- Rubber mallet to tamp post
- Funnel for filling post
- Ladder for high fences
Cleaning Up
- Scotch Brite-type pad
- Bucket and sponge
Additional Tools – Installing on Wood
- 2″ hole saw
- 1/2″ drill bit
- 3/4″ wrench
Additional Tools – Installing on Concrete
- 1/2″ masonry saw
- Core drill
Additional Tools – Wall Mount Brackets
- 1/4″ masonry drill for brick
- 1/4″ drill bit for wood pillar
Additional Tools – EZ Set Brackets
- 7/16″ wrench
Bufftech Privacy Fence – New Lexington
1. Getting Started
• Be sure to call underground prior to digging
• Assemble gates (if necessary) and decide where they will be located
• Stake out the fence line
• Space and mark post hole locations for gate and sections (spacer bar/template may be useful)
• Start at gate end post and work outward to determine proper fence height relative to ground
2. Dig Holes
• Dig holes 30″ deep or to frost line
- hole size for 5 x 5 posts = 12″
• Clean holes and check for straight walls
3. Install First Post
• Insert post in hole
• Determine rough height
• Fill hole around post with concrete mix (sand, gravel and cement) approximately 2″ below grade
• Tamp concrete in hole to eliminate
4. Install Bottom Rail
• Tape the ends of any rail going into a post that is to be filled with concrete to prevent concrete seepage
• Insert lock ring in both ends of bottom rail
• Depress lock ring tabs, insert bottom rail in post
• Tabs will recoil to hold rail in post
5. Install Second Post
• Insert second post in hole
• Insert bottom rail in post
• Insert block under bottom rail to position of correct fence height
• Fill hole around second post with concrete mix
• Tamp, level and square fence
• Assembly may be continued by installing all bottom rails first or one section at a time
6. Support and Secure
• Level and square fence
• To lower a post, place a wood block from corner to corner
of the post and carefully tap with a mallet
• Never strike the PVC post without a wood support
7. Install Pickets and Rails
• Insert pickets in bottom rail (last picket has tongue ripped to sit flush against post)
• Insert top rail over pickets
• Depress lock ring tabs, insert top rail in post
8. Hang Gate/Install Hardware
• For complete details, see gate installation instructions in hardware box
• Note: Actual preassembled gate width for Lexington is 42-3/8″
• Position gate between posts
• Allow 1″ gap for hinge and 3/4″ for latch and gate swing
• Block up gate to square with fence; rails should be level
• Gate hardware must be mounted to two sides of the post
9. Solidify Gate Posts
• It is critical that gate hinge and latch posts are solid to ensure proper gate functionality. Two methods are available:
A. Concrete and rebar
- Use two pieces of 1/2″ rebar in each hinge, latch and
end post
- Rebar should extend from the bottom of the hole to 12″ from the top of the post
- Hold rebar in opposite corners of post with rebar separator clips
- Fill post with concrete mix to cover rebar and hardware fasteners
- Tamp post with a rubber mallet to eliminate air pockets
- Leave gate on blocks for 72 hours to allow concrete to set
B. Aluminum gate post stiffener
- Slide aluminum gate stiffener inside hinge, latch or end posts with open end facing routed hole
- Drive a screw through the vinyl into the aluminum stiffener at the bottom of the post to hold in place
- Insert post into ground
- Fill hole with concrete around outside of post
10. Install Caps
• Install post caps
• Caps may be secured with glue, silicone adhesive or #8 x 3/4″ screws, caps and washers
Optional Instructions – Accents
Lattice – Lexington Style
Once the main fence section is installed, proceed as follows:
Lattice
• Leave one end of deco top rail out of post
• Starting at the end, slide lattice into top rail channel
• Insert rail into routed post, secure with lockring
• Starting at the end, slide 1 1/2″ square top channel over lattice
• Insert both ends of top channel into routed post
• Secure rail inside post with a #8 x 3/4″ screw (do this on both ends)


